in your app in the place you want the GC Component to be displayed and give it an intuitive identifier (i.e. gc-billing), to select when creating a component.
Example:
`
`
### 2.4. Create a Billing Component
A Billing component creates a billing request and guides the customer through the necessary steps to set up a mandate.
Billing components collect customer information (customer details, bank account information) to complete required actions for billing request fulfilment.
[
For more information about required actions for billing requests, please see our API reference.](https://developer.gocardless.com/api-reference#billing-requests-billing-requests)
Use GcComponents.createBillingComponent(selector, options).mount() to create and mount a billing component onto the page.
Example:
```javascript
const config = {
publicToken: YOUR_PUBLIC_TOKEN,
environment: Environment.Sandbox,
scheme: GcComponents.Scheme.Bacs,
};
// The config should be loaded before any components are created
GcComponents.loadConfig(config);
const componentOptions = {
onSuccess: () => console.log("Success!"),
onError: (error: GoCardlessError) => console.log("Error: ", error),
onReadyToFulfil: (billingRequestId: string) => {
// This method should call the endpoint from the Setup step to fulfil the billing request via the GoCardless API.
fulfil(billingRequestId);,
}
};
// Selector to identify the div where you want to embed the component
const selector = "#gc-billing";
GcComponents.createBillingComponent(selector, componentOptions).mount();
```
Billing component option callbacks explained:
| **Callback Name** | **Params** | **Trigger** | **Suggested Action** |
| onSuccess | N/A | Billing Component flow is complete and the BillingRequest has been fulfilled. | A success component will be displayed by GoCardless. You can redirect the payer to another success page if you wish. |
| onError | error: Error object containing the error type, message and any metadata | There was an error during the Billing Component flow. | An error component will be displayed by GoCardless and may give the option for the payer to retry. In some error scenarios you may want the payer to exit the flow. You can unmount the component if you wish. More details in [
Error Handling](#4_error_handling). |
| onReadyToFulfil | billingRequestId: ID of billing request which is now ready to fulfil | The customer has submitted all the information required to fulfil the billing request. | Fulfil the billing request by calling your billing request fulfil endpoint in your backend service. |
**
Important**
> You must implement the **onReadyToFulfil** callback otherwise the created billing request will not be fulfilled. The Billing Component will wait up to **10 seconds** for the billing request to fulfil before timing out and cancelling the billing request.
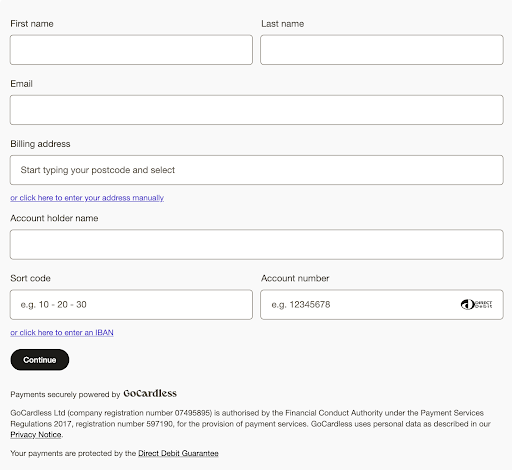
The mounted billing component will look something like this:
## 3. Testing
After completing the above steps you should be ready to start creating and fulfilling billing requests using GoCardless Components. To make sure everything works as expected you should run through the checkout flow end to end and make sure that you can reach the confirmation screen without encountering any errors.
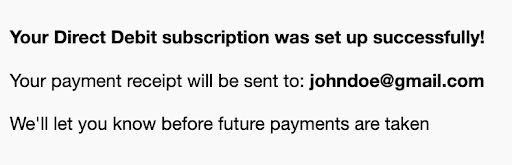
After confirmation, you can go into the GoCardless dashboard or use the API to verify that the mandate has been set up.
## 4. Error Handling
### 4.1 Initialisation errors
We recommend rendering our Error Component when encountering an error initialising the library.

Example:
```javascript
const { success: configSuccess, error: configError } =
await GcComponents.loadConfig(config);
if (configSuccess) {
GcComponents.createBillingComponent(selector, componentOptions).mount();
} else {
console.error(configError);
GcComponents.createErrorComponent(selector, componentOptions).mount();
}
```
Common initialisation error messages and their description:
| **Error Message** | **Description** |
| Authentication failed | Authentication failed. Please check that you are using a public token valid in the selected environment, with the ui-components scope and from the domain specified in public token creation. |
| Missing configuration | Some required properties are missing from your config object. Please refer to the table of configuration properties and ensure that all required properties are present in your config |
| Scheme not supports | This means you have attempted to use a scheme that Components does not currently support. Please ensure config.scheme is set to bacs or GcComponents.Scheme.Bacs. |
| HTML element not found | The library was unable to find the element in which to embed the component using your provided selector. Please ensure your selector is valid. |
### 4.2 Troubleshooting checkout errors
When an error occurs during the checkout flow, GoCardless will render an Error Component and call your return onError callback function provided, passing along the GoCardlessError object.

```json
// Example of GoCardlessError object returned in the onError callback
{
type: "authentication"
message: "Authentication failed. Please check your configuration",
metadata: {
subType: "invalid_api_usage",
requestId: "1f6f8649-6e40-4b50-936b-a8924dc7d2cb",
statusCode: "401",
},
isUnrecoverableError: false,
}
```
GoCardlessError object description:
| **Error Field** | **Description** |
| type | The error type |
| message | The details error message |
| metadata | Associated metadata for the error including the subType, requestId and statusCode |
| isUnrecoverableError | Returns true if the error was unrecoverable by the GoCardless Component and it could not provide an option for the payer to continue or retry the checkout flow. If this scenario occurs, we recommend you provide the payer with the option to exit the flow. false otherwise. |
Common checkout flow error messages and their description:
| **Error Message** | **Description** |
| TimeoutError | Upon triggering your onReadyToFulfil callback, the Billing Component will wait up to **10 seconds** for the billing request to fulfil before timing out and cancelling the billing request. GoCardless will provide the retry option in this case if it can successfully cancel the original billing request and will ask the payer to try again. |
| Authentication | You may receive this error with the error subType as SessionTokenExpired. GoCardless Components uses session tokens to make requests to the GoCardless API. These session tokens are valid for **30 minutes**. If a session token expires before the user completes the flow they will need to restart. GoCardless will provide the retry option in this case. |
## 5. Customisation
The GC Component can be customised to fit the UI of your page. This is done through the optional appearance parameter provided in the configuration step.
Example:
```javascript
const appearanceVariables = {
variables: {
backgroundColor: "#bfe6f2",
inputBorderRadius: "0px",
wrapperBorderRadius: "0",
textFontFamily: "Georgia, serif",
},
};
const config = {
publicToken: YOUR_PUBLIC_TOKEN,
environment: Environment.Sandbox,
scheme: GcComponents.Scheme.Bacs,
appearance: appearanceVariables,
};
GcComponents.loadConfig(config);
```
You can modify colours, fonts, borders, padding etc. for a variety of different on-screen elements.
We recommend playing around with backgroundColor, textFontSize, textFontFamily, buttonColor and buttonBorderRadius to get started.
You may notice that GoCardless Components come with some default styling even when no appearance variables are provided. Any appearance variables you add will be applied on top of the default styles.
Full list of appearance variables and their default values:
```json
export const defaultTheme: AppearanceVariables = {
backgroundColor: "#F9F9F9",
buttonBorderRadius: "32px",
buttonColor: "#1C1B18",
buttonHoverBackgroundColor: "#545048",
buttonHoverColor: "#faf9f7",
buttonSubmitTextContent: "Set up this Direct Debit",
buttonTextColor: "#FAF9F7",
buttonTextFontSize: "12px",
buttonTextFontWeight: FontWeight.medium,
checkboxBackgroundColor: "#DFDFDF",
checkboxSize: "16px",
checkboxTextColor: "#1C1B18",
checkboxTextFontSize: "14px",
checkboxTextFontWeight: FontWeight.normal,
dropdownFooterBackgroundColor: "#faf9f7",
dropdownFooterBorderColor: "#dfddda",
dropdownHoverBackgroundColor: "#1C1B18",
dropdownHoverTextColor: "#FFFFFF",
dropdownPadding: "8px",
formValidationErrorColor: "#C52F2F",
formVerticalSpacing: "12px",
hintTextFontSize: "12px",
hintTextFontWeight: "600",
inputBackgroundColor: "#FFFFFF",
inputBorderColor: "#8C8579",
inputBorderRadius: "4px",
inputPadding: "12px",
inputPlaceholderColor: "#6E685E",
inputTextColor: "#1C1B18",
inputTextFontWeight: FontWeight.normal,
labelTextColor: "#545048",
labelTextFontSize: "14px",
labelTextFontWeight: FontWeight.normal,
linkHoverTextColor: "#1E1751",
linkTextColor: "#5949CB",
linkTextFontSize: "12px",
linkTextFontWeight: FontWeight.normal,
loadingSpinnerColor: "#1e1a14",
textColor: "#000000",
textFontFamily: 'Inter, "Helvetica Neue", Helvetica, Arial, sans-serif',
textFontSize: "14px",
textFontWeight: FontWeight.normal,
wrapperBorderRadius: "8px",
wrapperMargin: "16px",
};
```
## 6. Prefilled Customer details
The GoCardless Component allows prefilling customer details in the billing form. This is done through the optional prefilledCustomer parameter provided in the configuration step.
For security reasons, we don’t store and prefill any bank details. Only customer and customer billing details could be prefilled.
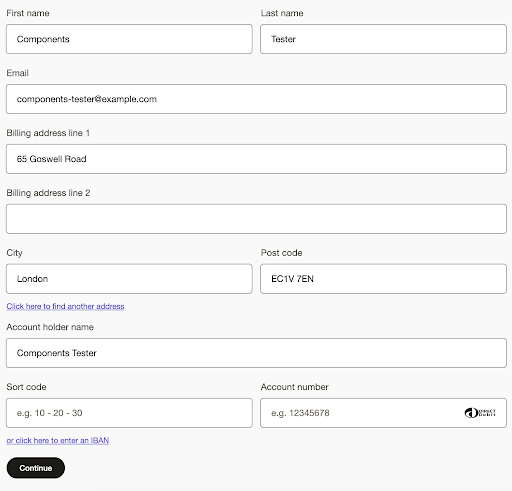
Here is a configuration example with a full list of prefilledCustomer fields:
```javascript
const prefilledCustomer = {
firstName: "Components",
lastName: "Tester",
email: "components-tester@example.com",
addressLine1: "65 Goswell Road",
addressLine2: "",
city: "London",
postalCode: "EC1V 7EN",
};
const config = {
publicToken: YOUR_PUBLIC_TOKEN,
environment: Environment.Sandbox,
scheme: GcComponents.Scheme.Bacs,
prefilledCustomer: prefilledCustomer,
};
GcComponents.loadConfig(config);
```
With the example configuration, these details will be prefilled in the GoCardless Component billing form as shown below:
## 7. Analytics and data tracking
GoCardless Components includes analytics and tracking features that allow us to collect usage data. We use this data to improve our products' performance and usability.
### 7.1 Data collection details
| **Purpose** | **Service** | **Cookies** | **Description** |
| **Analytics** | GoCardless | ajs_anonymous_id analytics_session_id analytics_session_id.last_access | We track user events such as clicks and form interactions to understand how users interact with the components. This data helps us improve the user experience and product usability. Data is sent to a third-party analytics provider, Segment, to facilitate processing. |
As an integrator, it is your responsibility to obtain and manage user consent for data collection. We recommend you adhere to the following principles:
- **Explicit Consent:** You must obtain explicit user consent (e.g., via a clear "Accept" button) before enabling non-essential tracking. Note that some data, such as error telemetry, may be considered essential for product functionality and security.
- **Transparency:** Clearly inform users about the data being collected, the purpose of collection, and the third parties involved (GoCardless and Segment). This information should be included in your site's cookie policy or privacy notice.
- **Clear Language:** Use concise and easy-to-understand language without technical jargon.
### 7.2 Configure data collection
Data collection is enabled by default. You can configure this in your configuration when initializing Components.
```javascript
const config = {
...
enableAnalytics: true, // set to false to not send analytics to GoCardless
};
GcComponents.loadConfig(config);
```