# GoCardless Protect+
GoCardless Protect+ is our anti-fraud payment intelligence product.
We have been processing bank debit payments for over a decade, giving us industry-leading payment intelligence data based on tens of billions of dollars worth of payments, including payments across 37 countries.
Using this data we detect, verify, monitor, and challenge payers across the lifecycle of your payments.
With GoCardless Protect+ you are able to:
- detect suspected fraudulent payers using payment intelligence
- use advanced open-banking functionality to verify suspected fraudulent payers, based on your risk profile
- monitor fraudulent behaviour and its impact on your business
- take actions against the suspected fraudulent payers such as challenging unfair chargebacks or blocking payers entirely
All of this helps you stay one step ahead in the fight against payment fraud.
## Requirements
In order to use Protect+, you must complete the below steps and ensure you have integrated with our Billing Request API, which offers our latest and most advanced features.
> You will not be able to use Protect+ features if you miss any of the below steps.
### Request the Protect+ upgrade
**Merchants:**
Your organisation must have both the Protect+ and Verified Mandates upgrades enabled. Please get in contact with our [support team](mailto:help@gocardless.com) to enable this.
**Partners:**
The upgrade needs to be enabled individually at the organisation level if any organisation connected or signed up using your app wants to use Protect+. You can do this by contacting our [support team](mailto:help@gocardless.com).
### Integrate with Billing Requests API
**Merchants: **
In order to use Protect+, you must be using the payment pages that are supported using [Billing Requests API](https://developer.gocardless.com/billing-requests/overview). You can use the payment pages in any of the below forms:
- [Billing Request Flow - GC Hosted UI](https://developer.gocardless.com/billing-requests/verified-mandates): Your payers will be redirected to the Billing Request flow if you are using any of [Billing Request Flow API](https://developer.gocardless.com/api-reference#billing-requests-billing-request-flows), [Billing Request Template](https://developer.gocardless.com/api-reference#billing-requests-billing-request-templates), the [redirect flow API](https://developer.gocardless.com/api-reference#core-endpoints-redirect-flows), or adding customers using the authorisation link generated from the GC dashboard.
- [Custom Payment Pages](https://developer.gocardless.com/billing-requests/verified-mandates/billing-request-actions): Build your own integration with the Billing Requests API
- [JavaScript Dropin](https://developer.gocardless.com/billing-requests/verified-mandates/using-dropin)
**Partners**:
You need to have one of the above integrations in place for the organisations connected to your app to start using and getting benefits from Protect+ features.
## Features
Once you have completed the requirements, listed in the steps above, you will be able to benefit from the range of Protect+ features, available via the Billing Requests API and the merchant dashboard.
### API Features
### Verify risky payers using Verified Mandates
With Protect+ you are able to reduce fraud by verifying payers that are deemed as potentially fraudulent. We use our Machine Learning capability to determine if a payer needs to be verified, due to their fraud risk, while they are going through one of the payment pages above.
As part of the verification, payers will be asked to authenticate themselves by logging into their bank account, to prove their account ownership.
You will need to set the `verify` preference to `recommended` when creating the Billing Request or Billing Request Template.
The `recommended` setting will combine our Machine Learning with your custom Risk Setting options to determine which payers will be sent for bank authentication.
> If no option is specified, `recommended` will be used by default
More information about verified mandates and the countries which support this can be found [here](https://developer.gocardless.com/billing-requests/verified-mandates#before_we_begin_availability_and_preference)
> If you are a **Partner** then setting verify to `recommended` will
>
> - verify the risky payers if the connected merchant **has the Protect+ upgrade**
> - behave like `minimum` for the connected merchants **without the Protect+ upgrade** and verification will not be triggered
#### Billing Request:
```http
POST https://api.gocardless.com/billing_requests HTTP/1.1
{
"billing_requests": {
"mandate_request": {
"scheme": "bacs",
"verify": "recommended"
}
}
}
```
#### Billing Request Template:
```http
POST https://api.gocardless.com/billing_request_templates HTTP/1.1
{
"billing_request_templates": {
"mandate_request_scheme": "bacs",
“mandate_request_verify”: “recommended”
"redirect_uri": "https://my-company.com/landing",
}
}
```
You can confirm that a payer has completed bank authorisation in three ways. Once complete:
- the query parameter of either `outcome=success` or `outcome=failure` will be appended to the redirect_uri. If the bank authorisation has expired, the parameter will be set to `outcome=timeout`. The payer at this point can be prompted to try the bank authorisation step again (although this may be the result of a fraudulent payer being deterred).
- responses through the mandate endpoints will contain the `verified_at` field with a timestamp of when the mandate was verified.
- the mandate page will have its verification status displayed within the merchant dashboard:

### Blocks
With Protect+, you are able to prevent certain customer details from being used when creating mandates. These include email domains, email addresses, and bank details.
This feature can be accessed using the [API](https://developer.gocardless.com/api-reference#core-endpoints-blocks) as well from the Blocklist page on the merchant dashboard (see below)
### Dashboard Features
Under the Protect+ section of the merchant dashboard, you can access the below features.
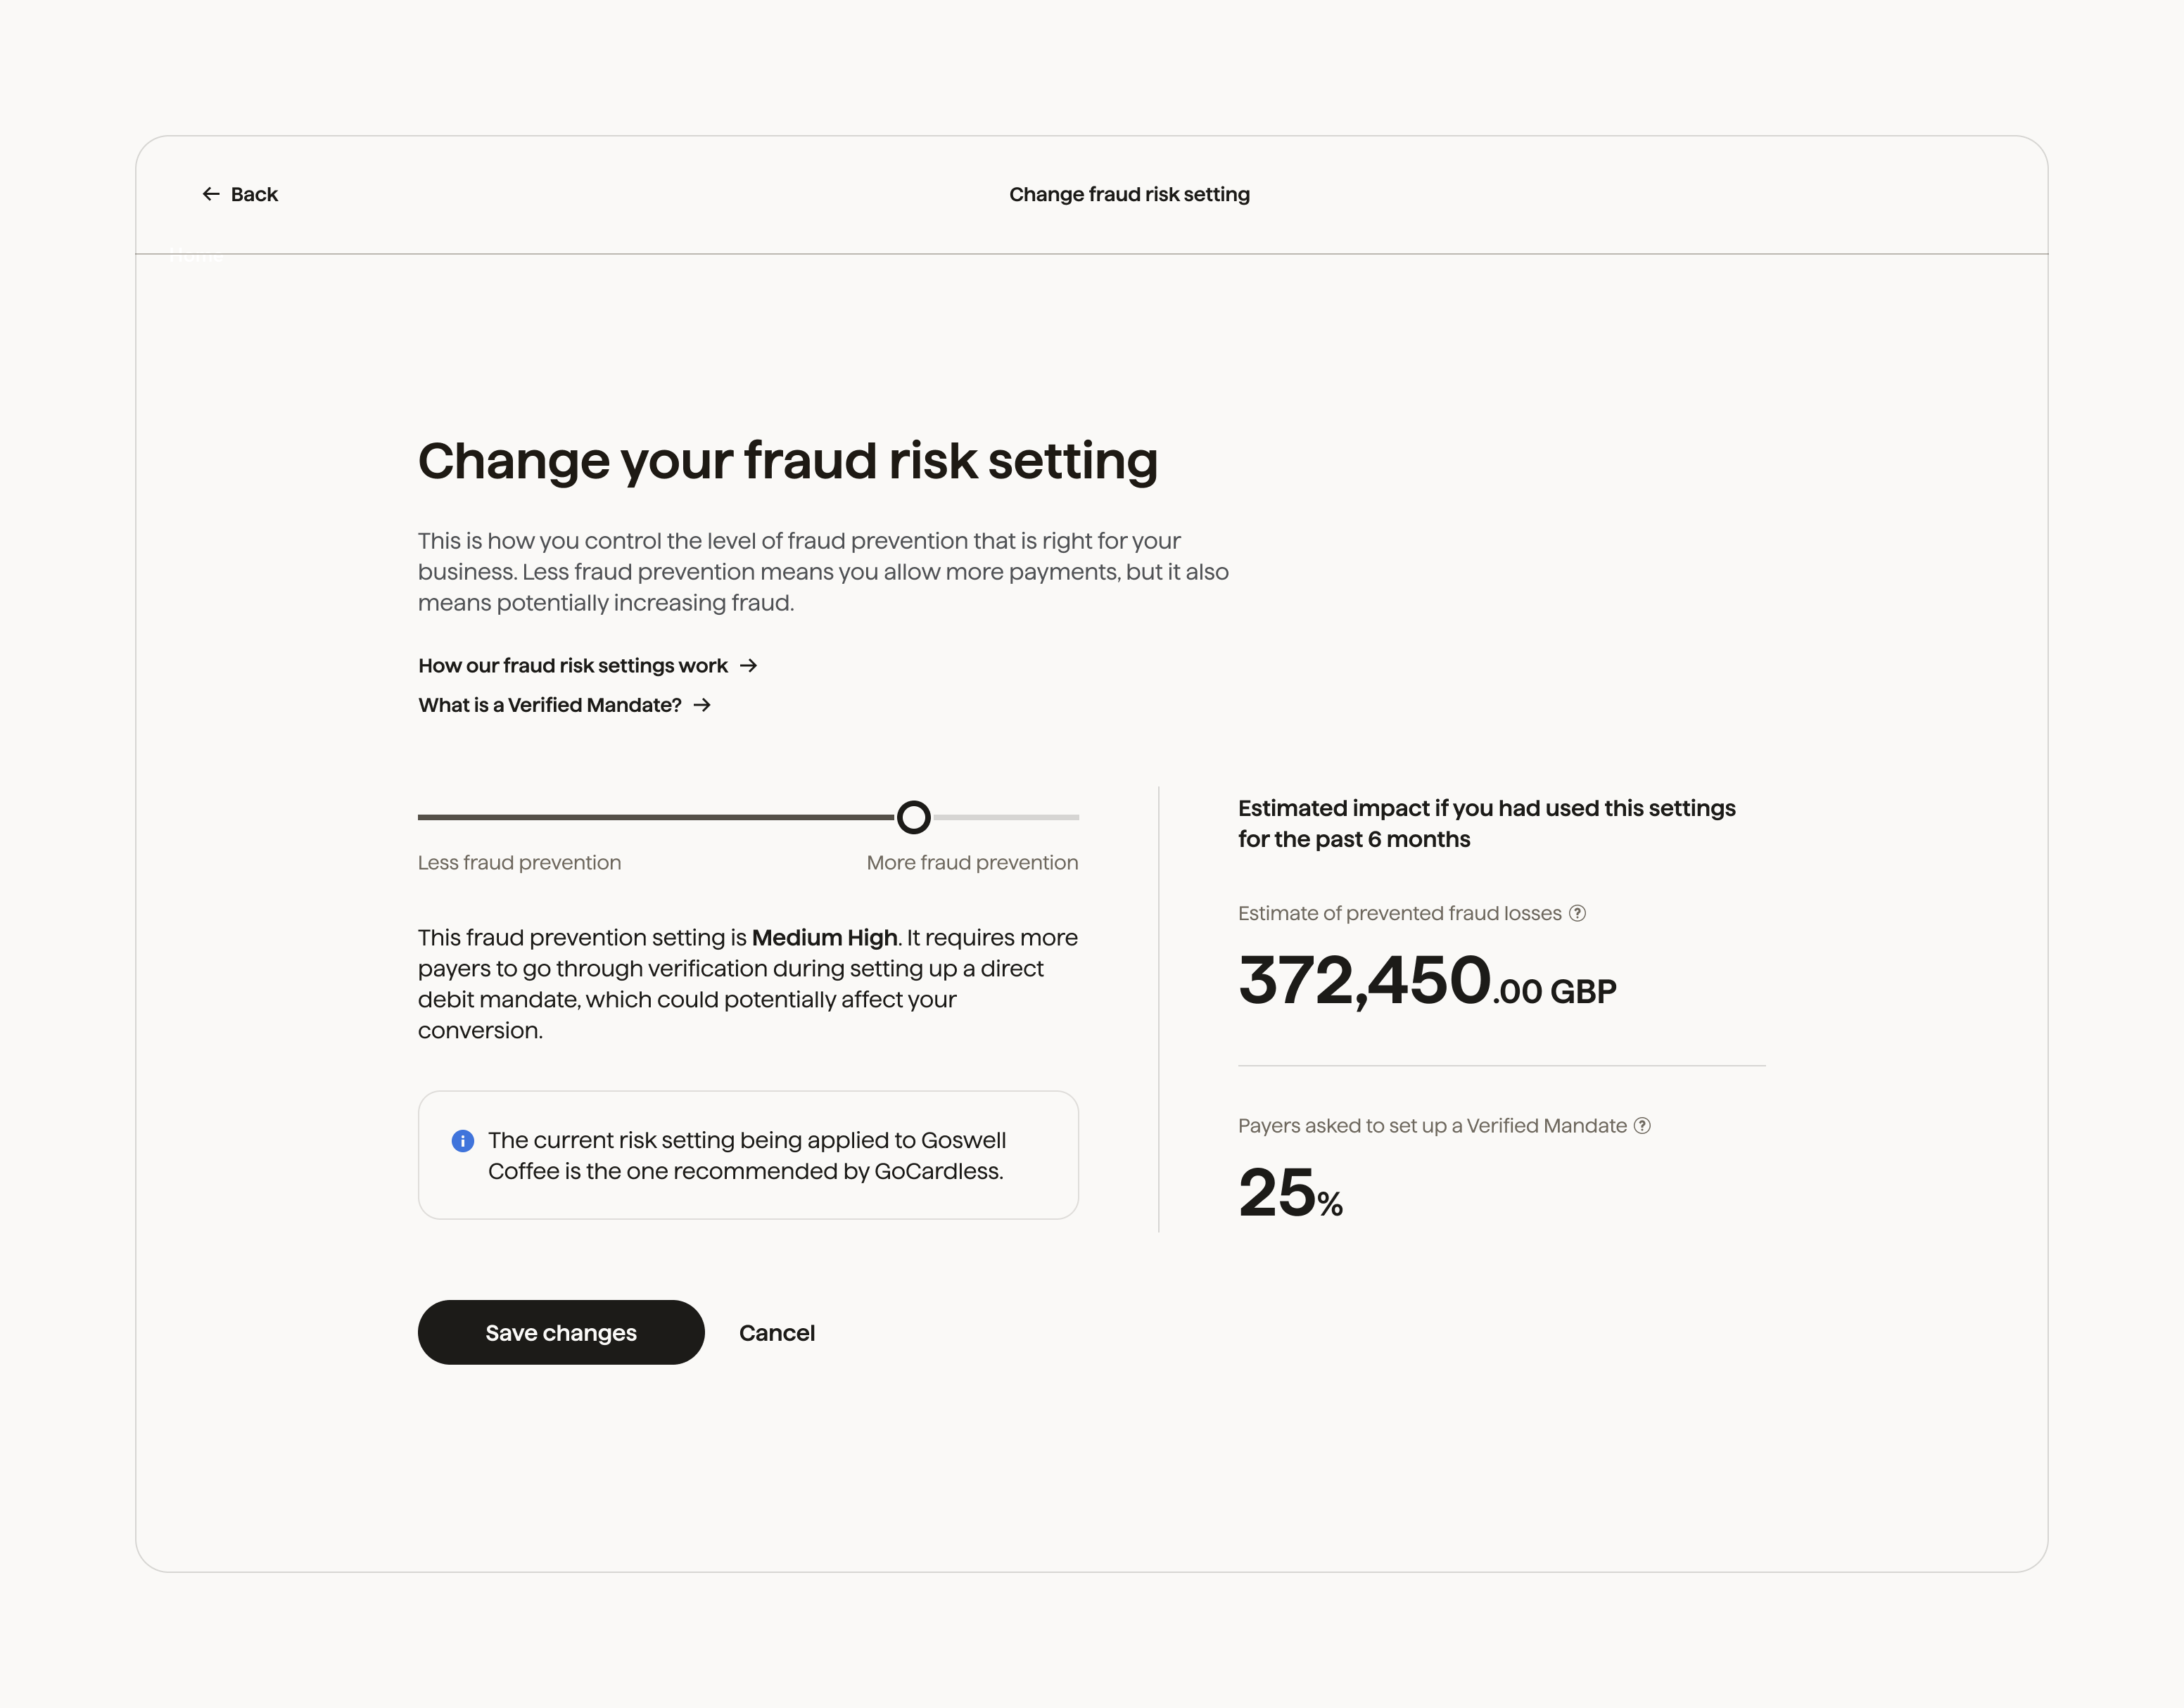
### Risk Settings
The Risk Settings page allows you to control the level of fraud prevention that is right for your business.
We combine the risk score returned by our Machine Learning model with the Risk Setting you have configured on the merchant dashboard to determine if a payer should be sent for verification.
A lower risk setting means fewer payers will be sent for verification checks, which could increase your exposure to fraud. On the other hand, a higher risk setting could impact conversion, which is why we have made it easy for you to specify the setting that matches your risk appetite.
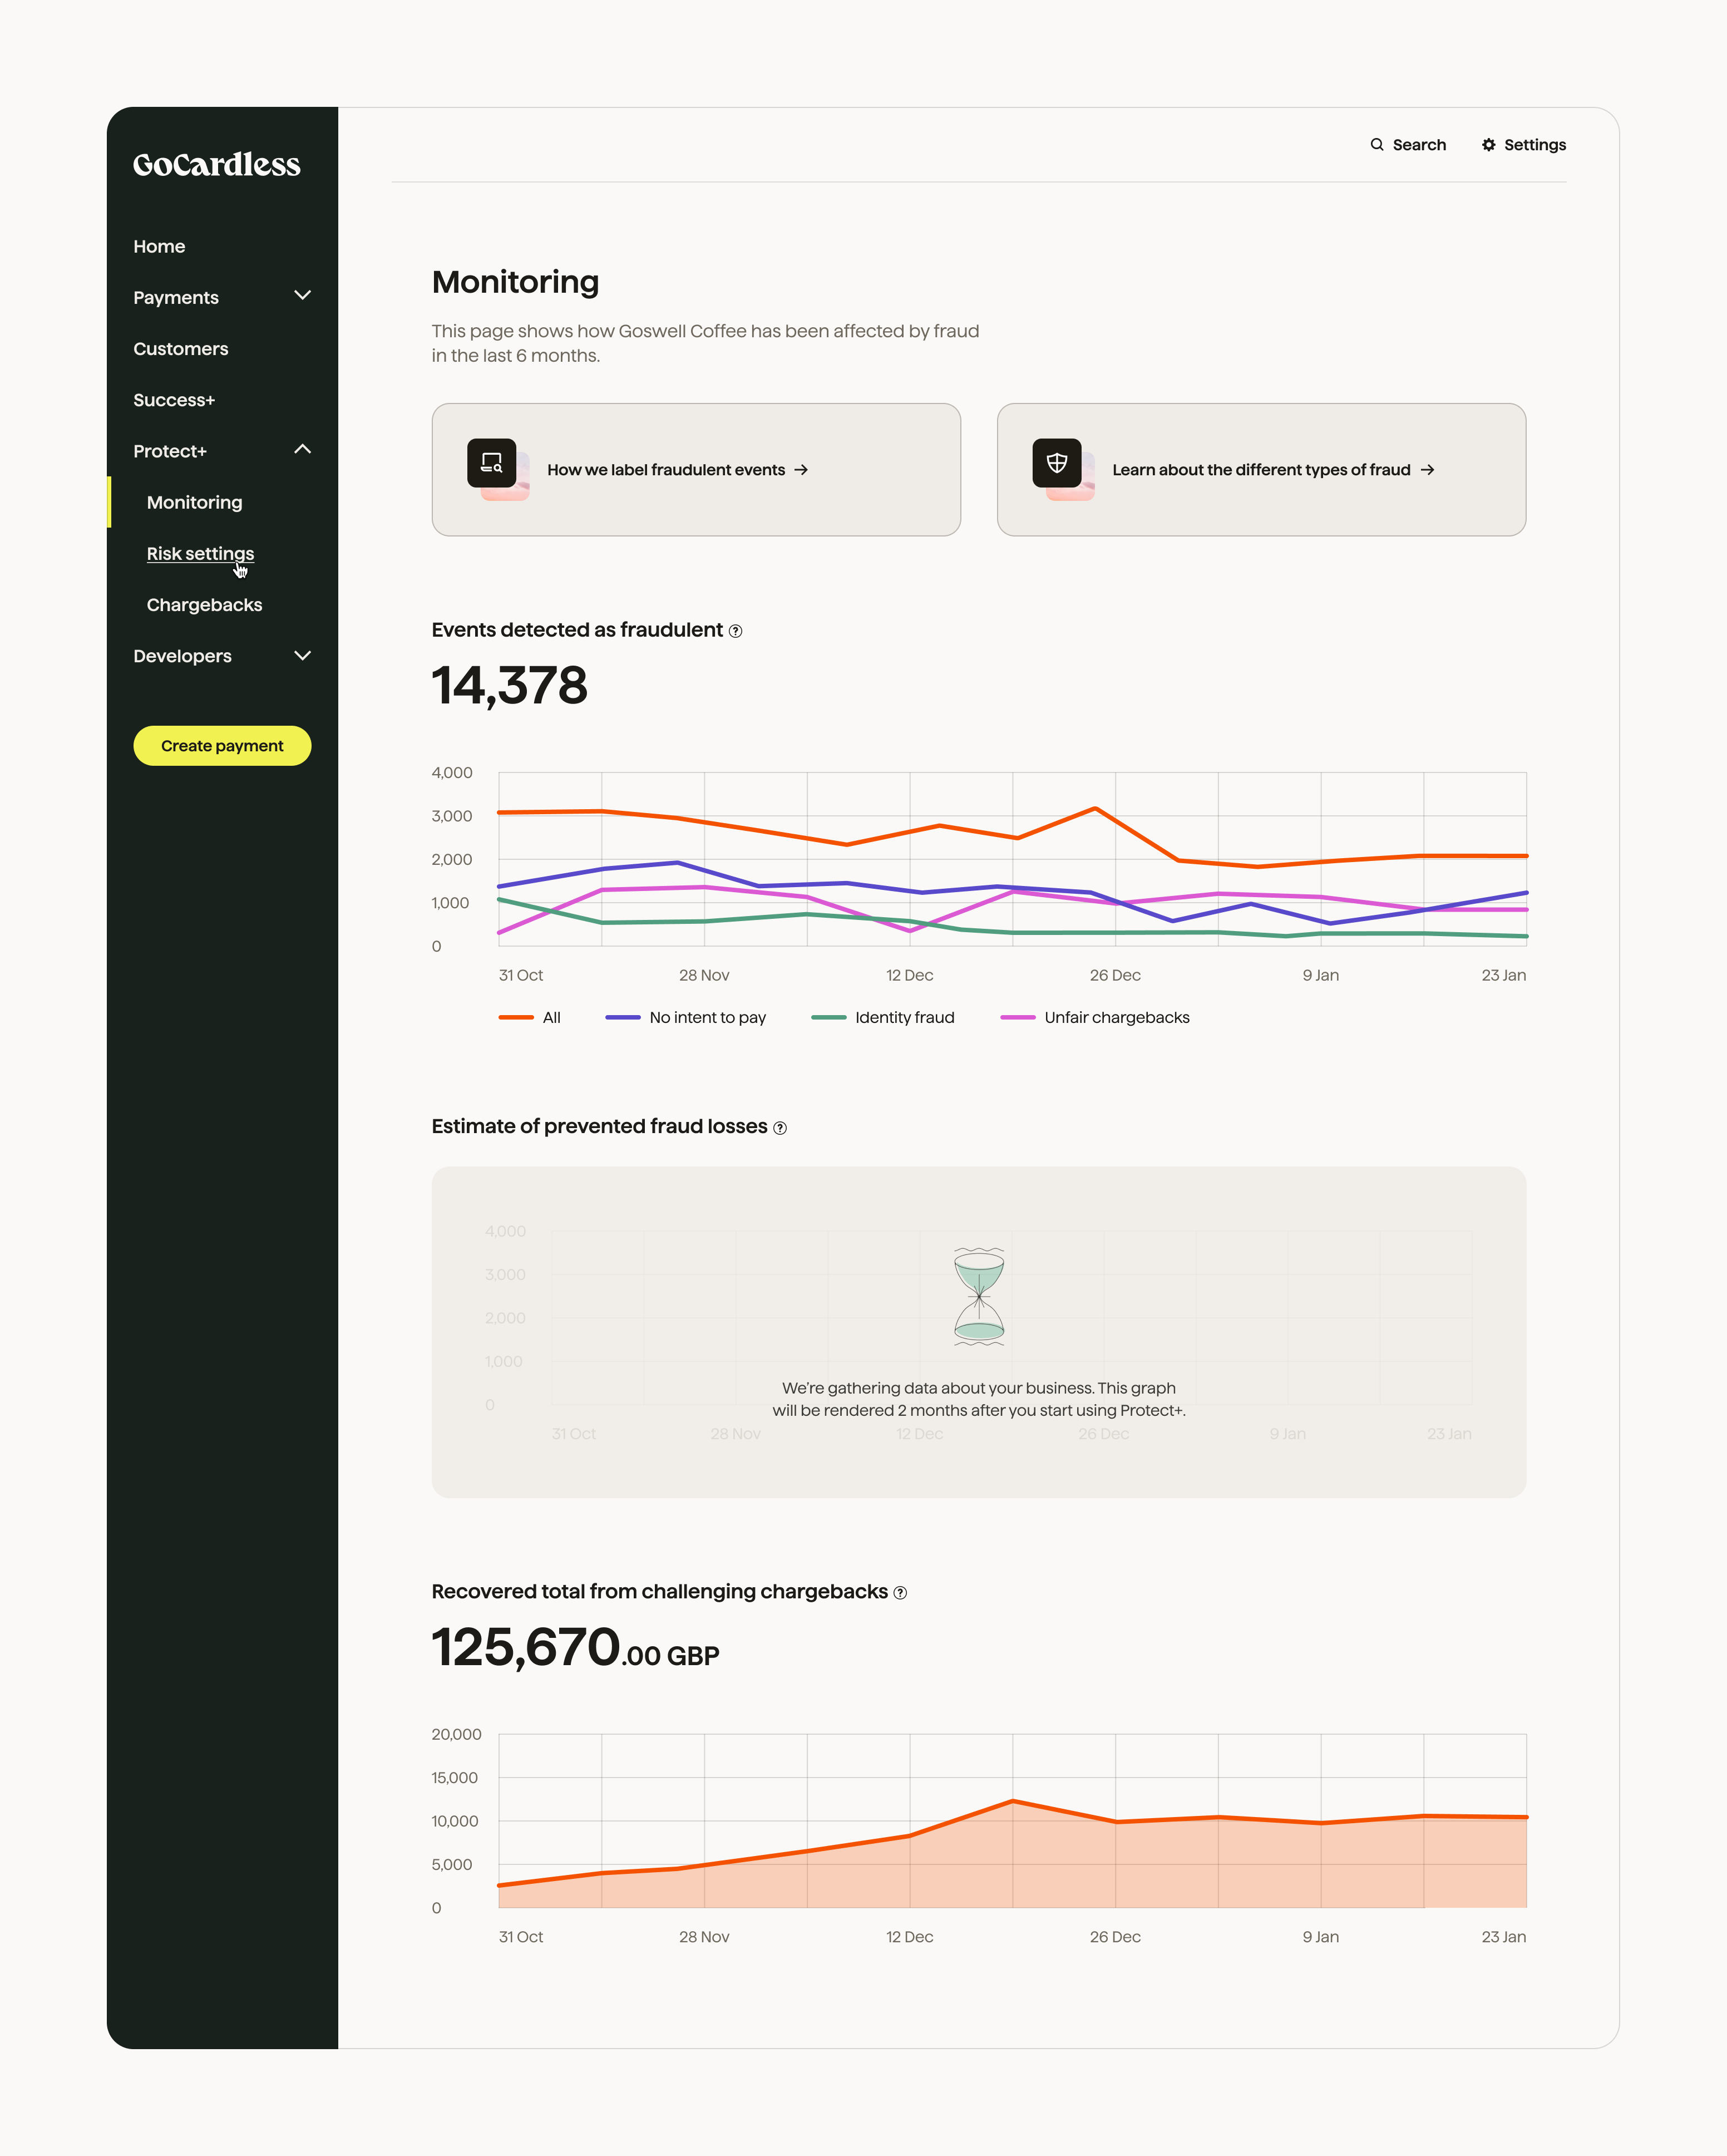
### Monitoring
The Monitoring page allows you to:
- Monitor the fraudulent activities affecting your account. This data will help you to decide which decisions to take to tackle fraud with the features offered by Protect+, such as challenging chargebacks, verifying payers, and blocking known fraudsters.
- Easily visualise and understand the impact of Protect+ on your business.
> If you are new to GoCardless, you may need to wait for your account to have at least two months of data before you can see some of the metrics.
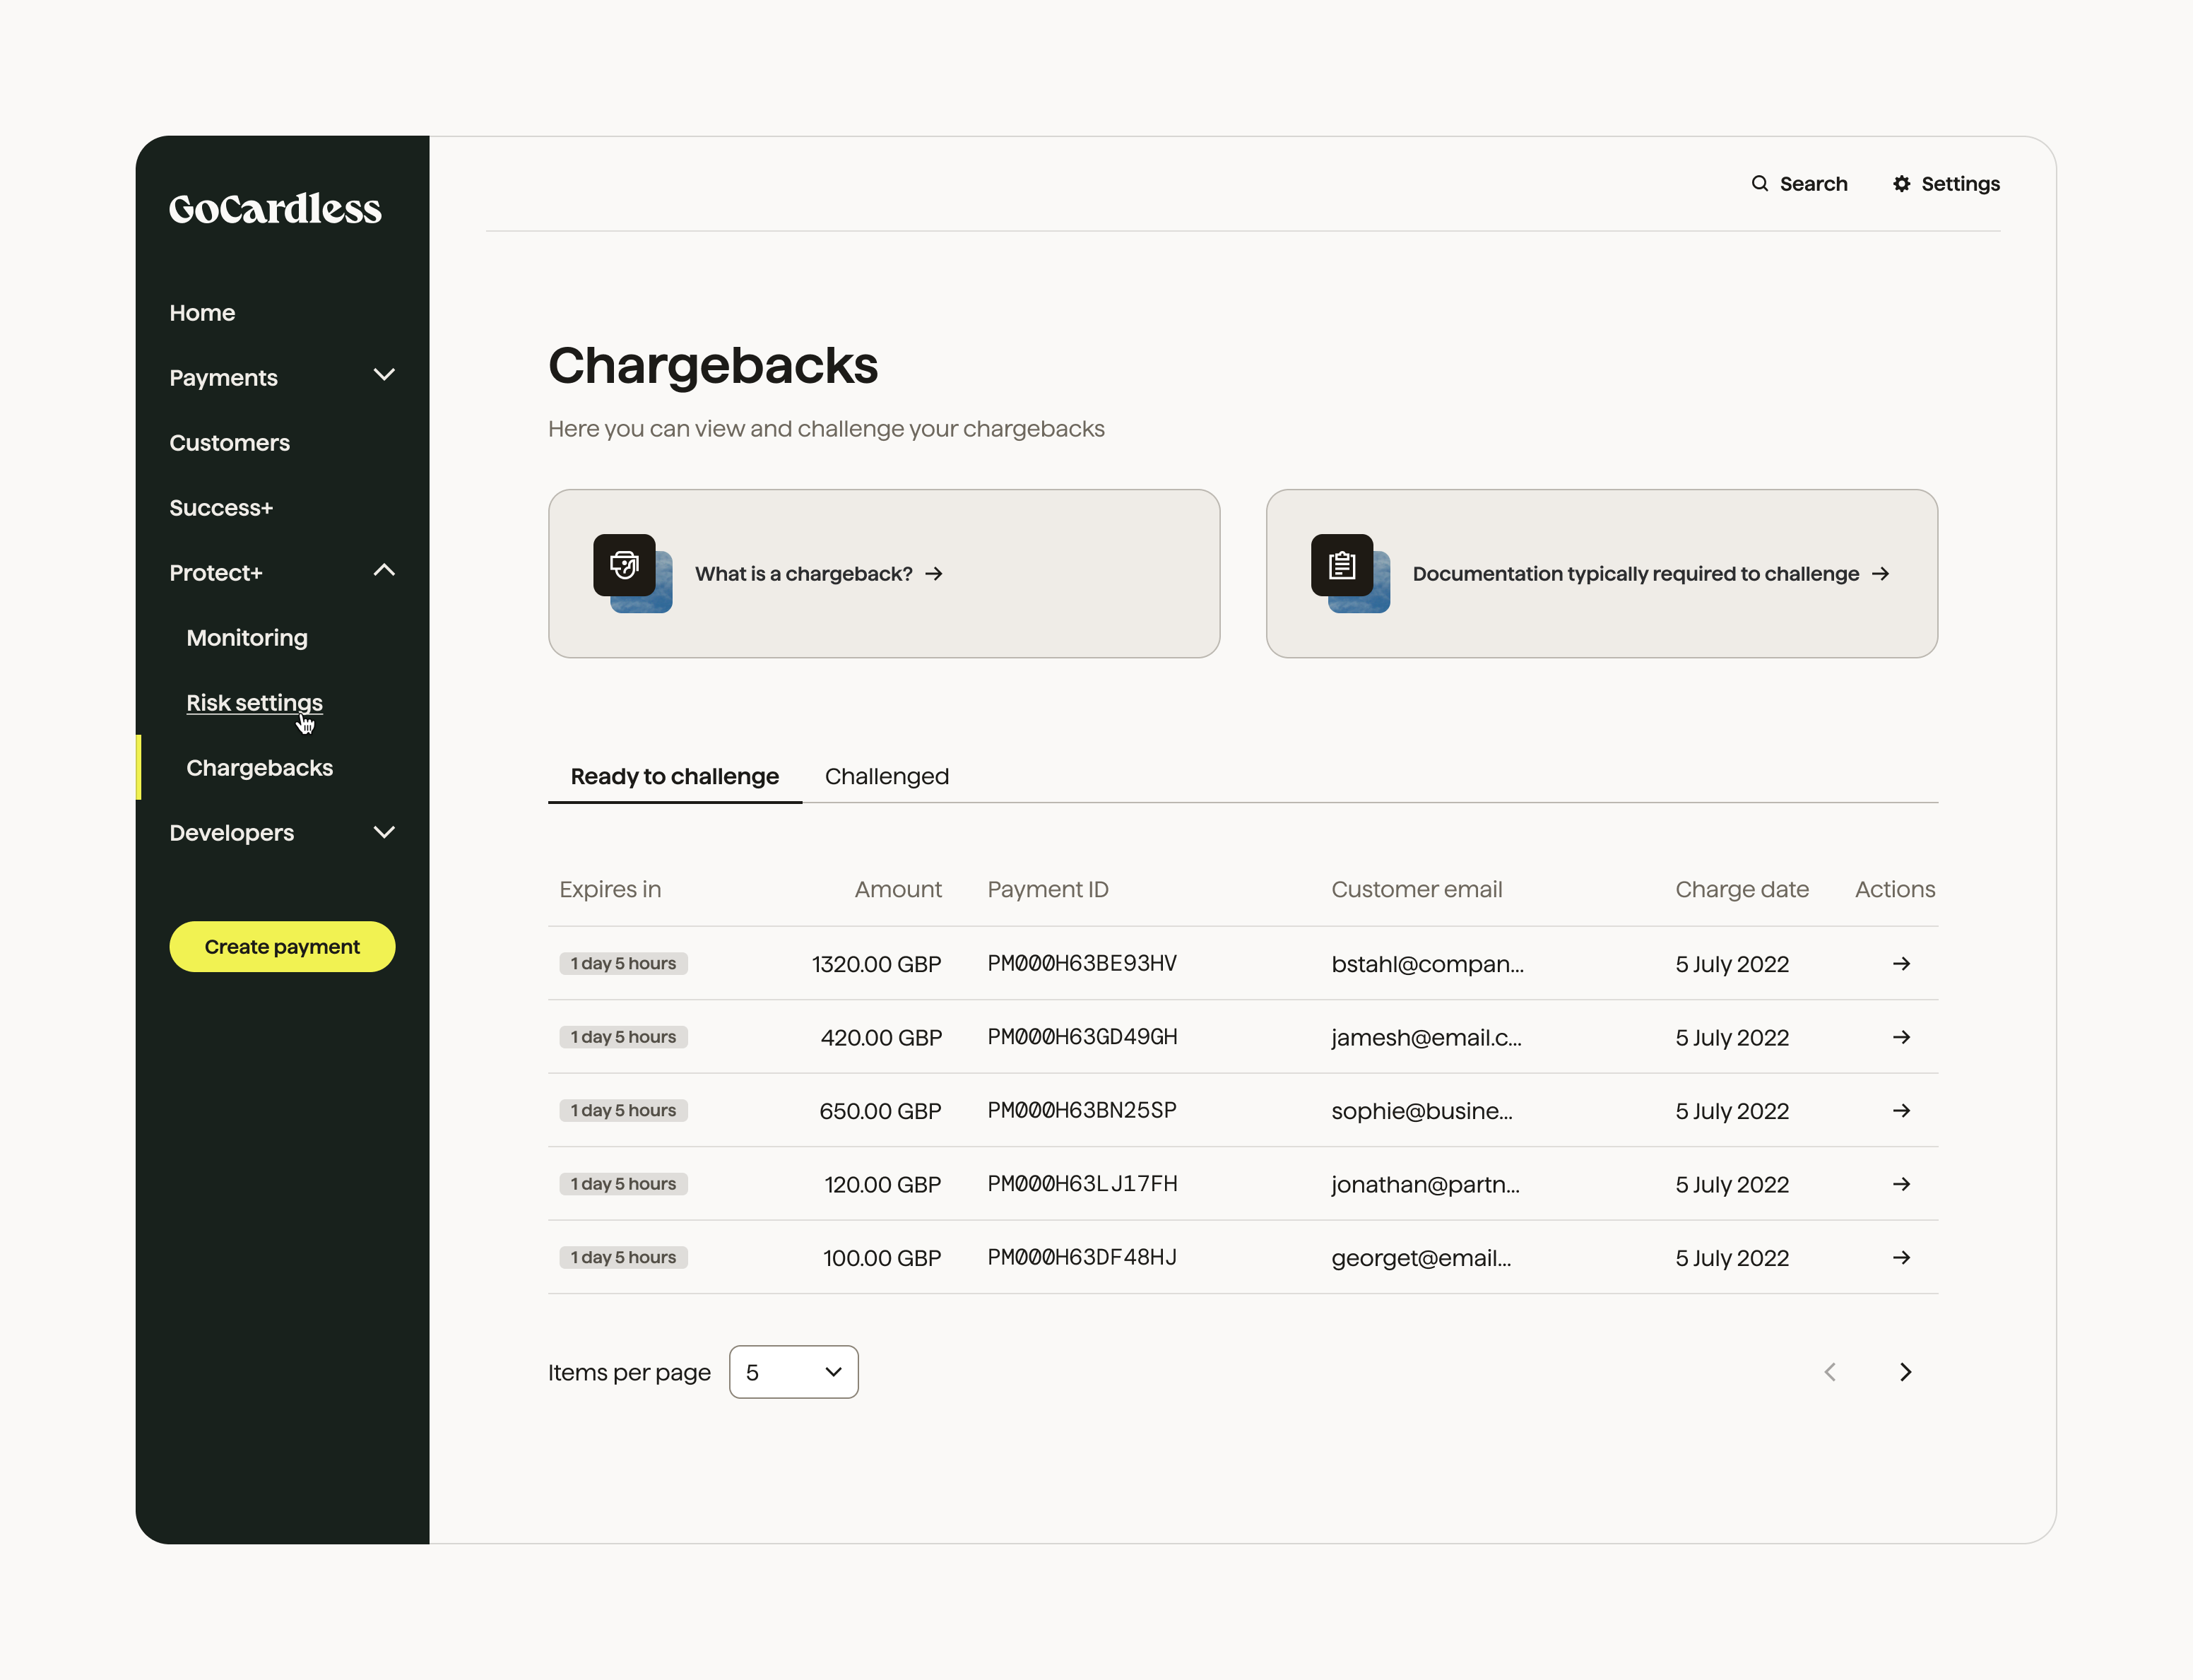
### Chargebacks
The Chargebacks page lists chargebacks by your customers, and allows you to challenge any which you believe have been unfairly charged back.
In this section, you can upload the required evidence to support your challenge, as well as track the status of any challenged chargeback.
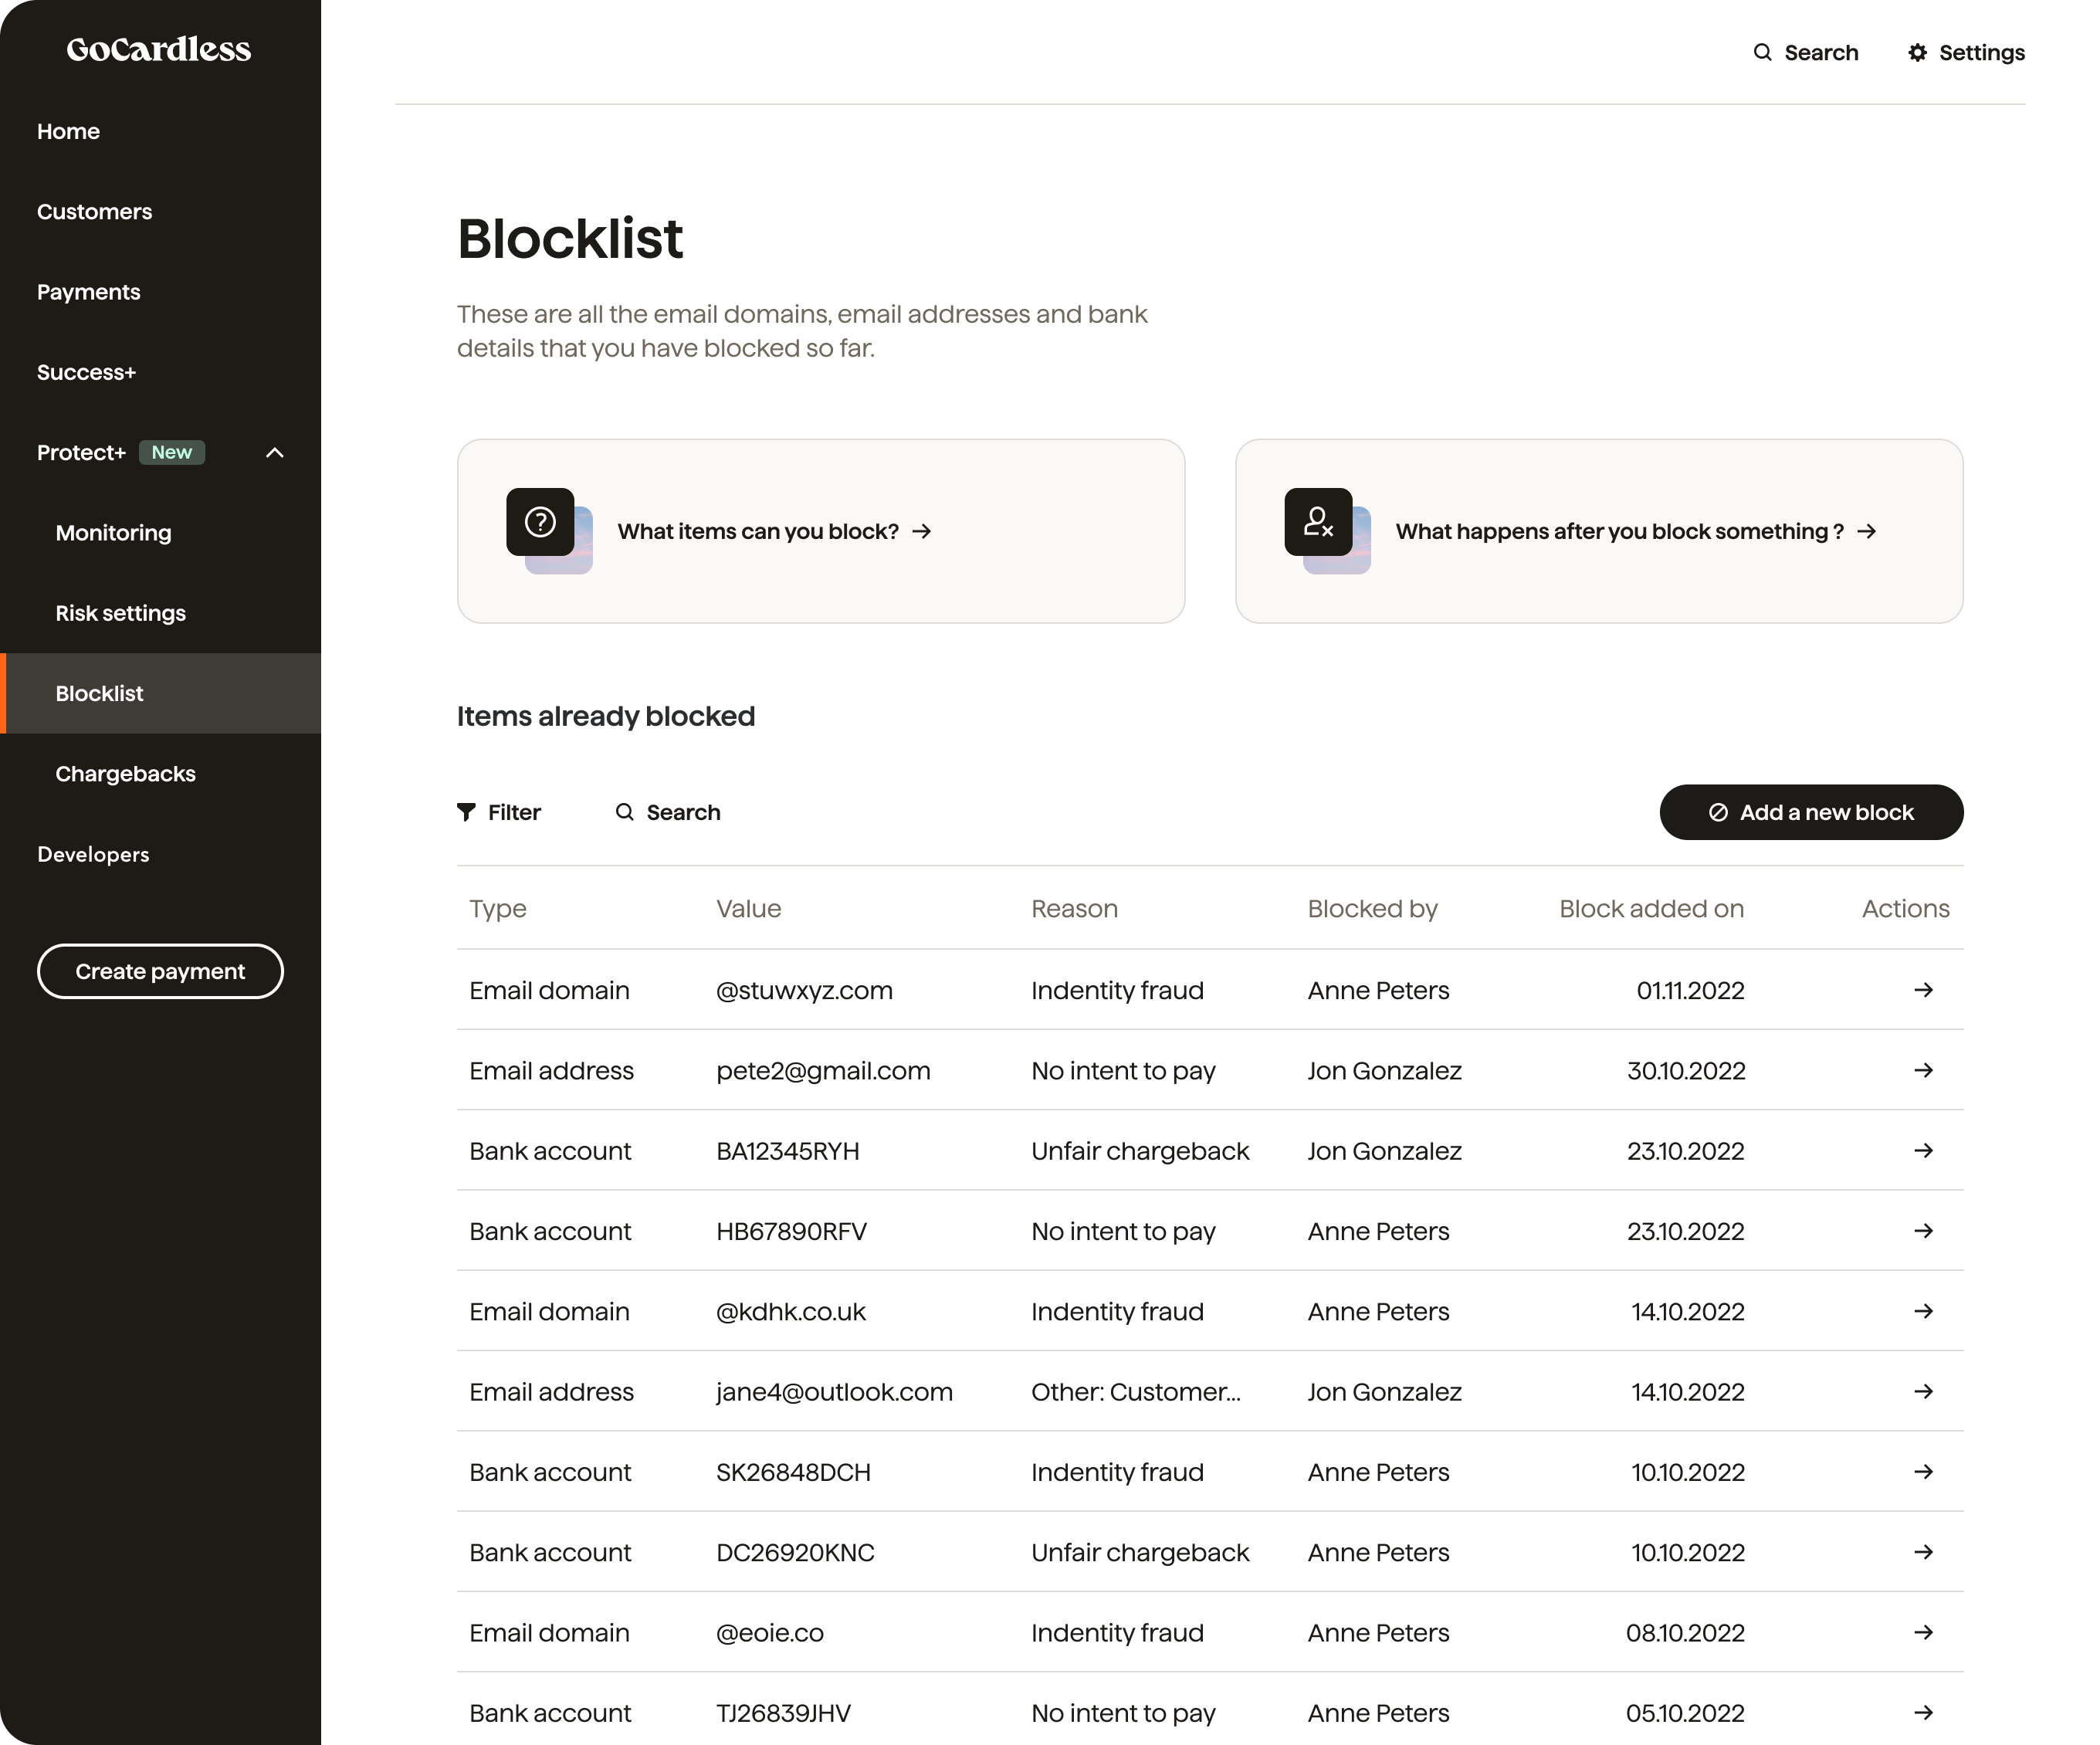
### Blocklist
The blocklist page enables you to block customers using certain details from setting up new mandates. You are able to block the email domain, email address, and bank details of suspected fraudsters. You can also use the mandate ID or customer ID to block the email address and bank account details linked to that customer.
On the blocklist page, you can:
- Create a block
- List the items already blocked
- Remove a block
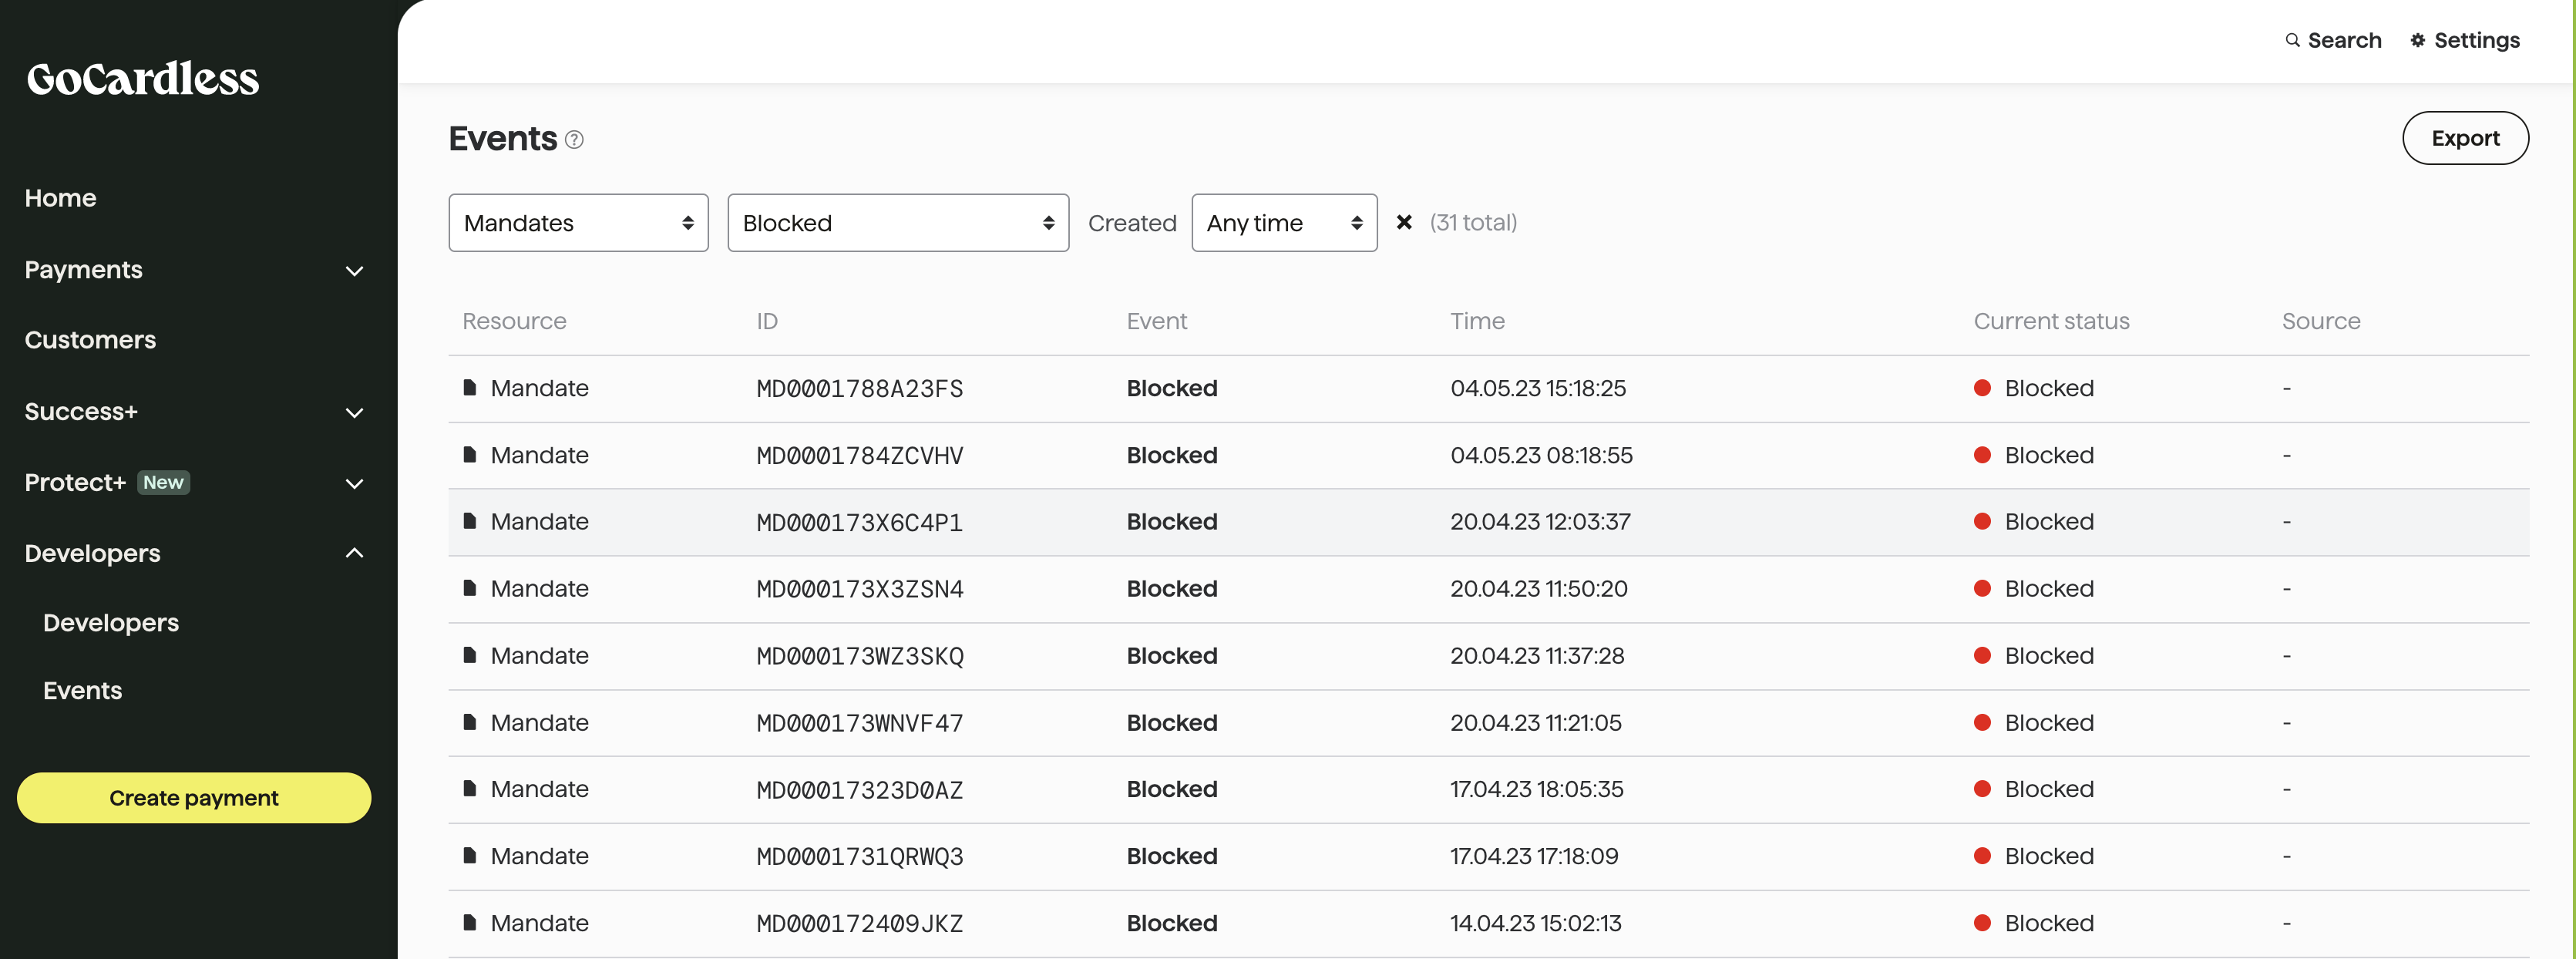
All blocked mandates can be viewed under the Events page of the merchant dashboard using the ‘Blocked’ filter for Mandates.